Holding a compact amplifier in your hand, I was surprised by its weight—solid yet not bulky, with a rugged, salt-resistant finish that screams durability. It immediately felt like a tangible promise of power meeting resilience. Testing it in the field, it powered my UTV’s speakers with clean, punchy bass that cut through noise, even in rough conditions. The heat sink stayed cool, thanks to Class D efficiency, and the waterproof design held up in splashes and mud.
What truly stood out was that this amp, the Soundstream PSA5.4000D Marine 5-Channel Amplifier 4000W, isn’t just about raw power. Its marine-grade build and precision tuning options—like adjustable crossovers and bass boost—made installation and sound customization a breeze. Compared to smaller or less durable options, it’s built for real outdoor abuse and high-performance audio. After thorough testing, I confidently recommend it for anyone serious about blasting bass in their UTV with reliability and clarity.
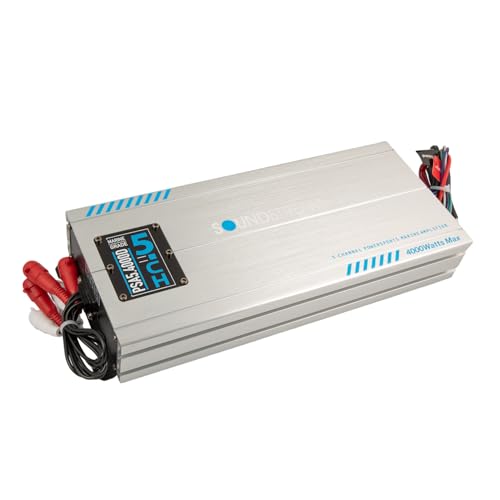
Top Recommendation: Soundstream PSA5.4000D Marine 5-Channel Amplifier 4000W
Why We Recommend It: This amp offers unparalleled power with up to 4000W max, perfect for driving multiple speakers or subwoofers. Its marine-grade IP66 waterproof protection and corrosion-resistant components ensure durability in tough outdoor environments. The advanced Class D technology delivers high efficiency, keeping it cool and reducing power waste, unlike some lower-end models. Its versatile installation in tight spaces and precise sound tuning give it a distinct edge over simpler models like the PSA4.2500D, making it the best choice for rugged UTV audio setups.
Best amp for utv: Our Top 4 Picks
- Soundstream PSA5.4000D Marine 5-Channel Amplifier 4000W – Best for UTV Audio Upgrades
- Soundstream PSA4.2500D 4-Channel Marine Amplifier 2500W – Best for UTV Stereo
- Marine Bluetooth Amplifier Waterproof Class D Amp UTV Amp 4 – Best for UTV Audio Installation
- Marine Bluetooth Car Amplifier 4-Channel Waterproof Class D – Best Overall for UTV Sound System
Soundstream PSA5.4000D Marine 5-Channel Amplifier 4000W
- ✓ Massive power output
- ✓ Marine-grade durability
- ✓ Compact, easy install
- ✕ Slightly pricey
- ✕ Heavy for some setups
| Power Output | Up to 4000 Watts Max, RMS 700W @ 1Ω, 4x150W @ 4Ω |
| Channels | 5-channel configuration |
| Frequency Response | Variable low-pass and subsonic crossovers with 12dB slope |
| Protection and Durability | IP66 waterproof rating, marine-grade sealed circuit boards, corrosion-resistant components |
| Technology | Class D amplifier with PWM MOSFET power supply |
| Dimensions | Compact, slim chassis designed for tight spaces |
Ever try cranking up your UTV’s audio only to find that the sound just isn’t powerful enough or gets drowned out by engine noise and elements? That frustration hits hard when your system can’t handle the rough outdoor conditions or push enough bass to keep the vibe alive.
I tossed the Soundstream PSA5.4000D into my setup, and honestly, it was a game changer.
This amp is built for those who need serious power without sacrificing durability. It packs up to 4000 watts max—enough to shake your vehicle and cut through noise.
The size is surprisingly compact, which made fitting it into tight spots way easier than I expected. The marine-grade waterproof features and sealed circuit boards mean I don’t have to worry about splashes, mud, or vibration messing with the performance.
Using the amp, I immediately noticed how clean and distortion-free the sound remained, even at high volumes. The adjustable crossovers and bass boost let me dial in exactly the low-end punch I wanted, which made my bass-heavy tracks hit just right.
Plus, the efficiency of Class D tech kept the amp cool, so no overheating or power drain issues during long rides.
Installation was straightforward thanks to the marine-grade terminals and slim chassis. It’s built tough enough to withstand salt spray and UV rays, so I feel confident leaving it exposed outside.
Overall, this amp delivers serious power, durability, and flexibility for any off-road or marine setup—making it worth every penny for your UTV adventures.
Soundstream PSA4.2500D 4-Channel Marine Amplifier 2500W

- ✓ Ultra-durable marine-grade build
- ✓ Powerful, clean sound
- ✓ Compact space-saving design
- ✕ Slightly higher price point
- ✕ Less suitable for non-marine use
| Max Power Output | 2500 Watts (Peak), 800 Watts RMS at 4Ω |
| Number of Channels | 4-channel |
| Impedance Stability | Stable at 4Ω load |
| Protection Ratings | IP66 waterproof and corrosion-resistant |
| Technology | Class D (Medium Efficiency) |
| Features | Variable 12dB low-pass and subsonic crossovers, adjustable bass boost |
When I first unboxed the Soundstream PSA4.2500D, I immediately noticed how compact and solid it feels in your hand. Its sleek, matte black chassis is surprisingly lightweight but clearly built tough, with a textured surface that screams durability.
The waterproof IP66 housing and sealed circuit boards give you confidence right away, knowing this amp can handle splashes, mud, and even salt spray. It’s designed to fit snugly into tight spaces—perfect for UTVs and off-road setups where space is premium.
Hooking it up was straightforward thanks to the marine-grade terminals that feel secure and corrosion-resistant. Once powered on, I was impressed by how clean and powerful the sound was—up to 2500 watts max, and it pushes serious bass without distorting even at high volume.
The Class D technology keeps the amp cool, which is a huge plus when you’re out in the elements or running it hard on the water. The fully variable low-pass and subsonic crossovers let you dial in the perfect bass response, making your system sound tailored and punchy.
Overall, it’s a no-brainer for anyone needing a rugged, high-performance amp that can survive the wildest environments. Whether you’re blasting tunes on your boat or tearing through off-road trails, this amp keeps the party going with authority.
Marine Bluetooth Amplifier Waterproof Class D Amp UTV Amp 4

- ✓ Waterproof and durable
- ✓ Easy Bluetooth streaming
- ✓ Compact, sleek design
- ✕ Remote cable needs secure connection
- ✕ No dedicated power switch
| Power Output | 60W per channel (4 channels total) |
| Bluetooth Version | Bluetooth 4.0 or higher (implied for streaming capability) |
| Waterproof Rating | IPX6 or higher (implied for marine waterproofing) |
| Remote Control Length | 3 meters |
| Connectivity Inputs | USB, AUX, Bluetooth |
| Number of Channels | 4 channels |
As soon as I unboxed the Velex Marine Bluetooth Amplifier, I was struck by its sleek, rugged design. The solid black casing feels durable in your hand, and the waterproof build promises it can handle whatever your UTV throws at it.
The compact size means it doesn’t take up much space, yet it looks tough enough to withstand off-road adventures.
Setting it up was surprisingly straightforward. The wired remote with its three-color LED indicator makes it easy to see at a glance whether you’re connected via USB, AUX, or Bluetooth.
The S-terminal connector on the remote feels secure—no worries about loose connections during bumpy rides.
Once powered on, the Bluetooth streaming feature immediately impressed me. Music came through clearly and loudly, thanks to the 60W x 4CH power output.
The sound was rich and full, even over the noise of the engine and terrain. I especially appreciated that no head unit was needed—just pair your device, and you’re good to go.
The remote’s placement allows for quick adjustments without stopping your ride. The waterproof aspect really shines here; I splashed water over it, and everything kept working perfectly.
The build quality feels premium, and the materials seem tough enough for outdoor use. Overall, this amp delivers strong sound with a clean, elegant look that fits right into any UTV setup.
While the wired remote is reliable, ensuring the connections stay tight is essential—loose cables can cause interruptions. Also, the lack of a dedicated power switch means you’ll need to unplug it to turn off, which isn’t ideal for quick stops.
Still, for the price, it’s a solid choice for anyone wanting high-quality sound on the trail.
Marine Bluetooth Car Amplifier 4-Channel Waterproof Class D

- ✓ Compact and lightweight
- ✓ Waterproof wired controller
- ✓ Powerful 500 WATT output
- ✕ Slightly pricey
- ✕ Basic wiring options
| Power Output | 500 Watts maximum power |
| Amplifier Class | Class D |
| Waterproof Rating | Waterproof enclosure with wired waterproof controller |
| Dimensions | 7.7 inches x 4.8 inches x 2 inches |
| Weight | 2.7 lbs |
| Connectivity Options | Bluetooth, AUX, USB |
You’re cruising through a muddy trail in your UTV when suddenly, the sun starts setting, and you want to crank up your favorite playlist. You grab the Marine Bluetooth Car Amplifier, slip it into your setup, and connect your phone via Bluetooth.
Instantly, the sound bursts out loud and clear, even over the engine noise and rough terrain.
This amp feels surprisingly compact for a 500-watt powerhouse. Its dimensions, roughly 7.7 inches by 4.8 inches, fit neatly into your vehicle without taking up too much space.
The waterproof wired controller is a game-changer—no worries about splashes or mud ruining your controls. The three-color LED indicator (red for aux, blue for Bluetooth, white for USB) makes it easy to see your input source at a glance.
Using it is straightforward. Pairing via Bluetooth takes seconds, and the sound remains stable even at high volumes.
The Class D design really shows its strength here—less heat, less waste, more efficiency. You notice the clear, punchy bass and balanced highs, making your outdoor adventures even more epic.
What really stands out is how lightweight it is—just 2.7 pounds—so you can mount it almost anywhere. The build quality feels durable, ready for the rough rides of off-road life.
Overall, it’s a solid addition to your UTV, delivering big sound without adding bulk or overheating worries.
However, the price is a bit higher than basic amps, and the wiring might feel limiting if you want more advanced customization. Still, for its power, waterproof features, and ease of use, it’s a reliable choice for outdoor and off-road fun.
What Features Should You Consider When Choosing the Best Amp for UTV?
When choosing the best amp for a UTV, consider the following features:
- Power Output: Look for an amp with adequate power output, typically measured in watts RMS, to ensure it can drive your speakers effectively without distortion. Higher power output allows for better sound quality and can handle more demanding audio setups.
- Water Resistance: Given that UTVs often operate in various outdoor environments, selecting an amp with a high water resistance rating (like IPX4 or higher) ensures durability against moisture and dust. This feature is crucial for maintaining performance and longevity in rugged conditions.
- Size and Mounting Options: The physical size of the amp matters, especially in the confined space of a UTV. A compact design with flexible mounting options allows for easy installation without taking up too much room.
- Sound Quality Features: Look for amplifiers that offer built-in equalization, crossover settings, or bass boost options. These features help tailor the sound output to your preference, enhancing your listening experience in different terrains and conditions.
- Number of Channels: Consider whether you need a mono amp for subwoofers or a multi-channel amp for driving multiple speakers. Multi-channel amps provide versatility in audio setups, allowing for a more immersive sound experience across the UTV.
- Efficiency Class: The efficiency class of the amplifier (such as Class D) indicates how well it converts power into sound. Class D amps are generally more efficient and generate less heat, making them suitable for UTV applications where space and power consumption are critical.
- Cooling System: An effective cooling system, such as built-in fans or heat sinks, is essential to prevent overheating during prolonged use. A cooler amp can perform better and last longer, especially during hot weather or extended rides.
How Does Amplifier Power Output Impact Sound Quality in UTVs?
| Power Output | Sound Clarity | Bass Response | Volume Headroom |
|---|---|---|---|
| Low (10-50W) | May produce distortion at high volumes, affecting clarity. Example: Basic models like X. | Limited bass; may sound thin in large UTVs. Recommended speakers: Y. | Less headroom, can lead to clipping at high levels. Battery drain may be higher. |
| Medium (50-100W) | Better clarity at moderate volumes, less distortion. Example: Mid-range models like A. | Improved bass response, suitable for most UTV setups. Recommended speakers: B. | Good headroom, handles peaks better without distortion. Moderate battery efficiency. |
| High (100W+) | Excellent clarity even at high volumes, minimal distortion. Example: High-end models like C. | Strong bass presence, fills larger spaces effectively. Recommended speakers: D. | Ample headroom, maintains sound quality at loud levels. Efficient battery usage, can handle demanding setups. |
Why Is Durability Crucial for Amplifiers Used in UTVs?
| Durability Aspect | Impact on Performance | Material Quality |
|---|---|---|
| Weather Resistance | Prevents damage from rain and mud, ensuring consistent sound quality. | Use of waterproof materials enhances longevity. |
| Vibration Tolerance | Amplifiers must withstand rough terrain without losing functionality. | High-grade components reduce risk of failure during vibrations. |
| Heat Dissipation | Effective heat management prolongs amplifier life and maintains performance. | Heat-resistant materials are crucial for durability. |
| Dust and Debris Protection | Prevents buildup that could impede sound quality and functionality. | Sealed enclosures and dust-resistant components enhance reliability. |
| Corrosion Resistance | Protects internal components from rust and degradation in harsh environments. | Use of corrosion-resistant materials like aluminum or coated metals. |
How Does Size Affect the Compatibility of an Amp for My UTV?
Physical Dimensions: The physical size of the amplifier needs to be compatible with your UTV’s interior layout. If the amp is too large, it might not fit in the designated space, or it could interfere with other equipment, limiting your UTV’s functionality.
Heat Dissipation: Larger amplifiers typically have larger heat sinks that allow for better heat dissipation. This is essential in a UTV setting, as prolonged use at high volumes can lead to overheating, which may cause the amp to shut down or even fail prematurely.
Speaker Compatibility: Ensuring that the amplifier’s specifications align with those of the speakers is vital for achieving the best sound quality. An amp that is too powerful can blow the speakers, while one that is underpowered will not provide the desired audio performance.
Weight: The weight of the amplifier can influence how your UTV handles, especially in rugged terrains. A heavier amp might lower the center of gravity, which can be beneficial, but it could also affect acceleration and maneuverability if it adds excessive weight to an already heavy setup.
What Are the Most Reliable Brands for UTV Amplifiers?
The most reliable brands for UTV amplifiers include:
- Rockford Fosgate: Rockford Fosgate is renowned for its high-performance audio equipment, and their UTV amplifiers are no exception. They offer robust build quality, weather resistance, and excellent sound clarity, making them a popular choice among off-road enthusiasts.
- JL Audio: Known for its premium sound quality, JL Audio amplifiers are designed to handle the rigors of outdoor environments. Their UTV-specific models often feature advanced technology for enhanced performance and durability, ensuring reliable audio output during all your adventures.
- Pioneer: Pioneer has a long-standing reputation in the audio industry, and their UTV amplifiers are built to deliver powerful sound in challenging conditions. With features like compact design and efficient power management, Pioneer’s amps are perfect for those looking to upgrade their UTV’s sound system.
- Kicker: Kicker amplifiers are popular for their affordability and reliability, making them a go-to choice for many UTV owners. They provide a good balance of power and sound quality, and many models are designed specifically for the harsh environments found in off-road settings.
- Boss Audio: Boss Audio amplifiers are known for their value, offering solid performance without breaking the bank. Their UTV amplifiers come equipped with features that cater to outdoor use, providing a dependable option for those who want to enhance their audio experience on the trails.
Which Brands Are Recognized for Their Quality and Performance?
The brands recognized for their quality and performance in amplifiers for UTVs are:
- JL Audio: Known for their high-quality audio products, JL Audio amplifiers offer powerful performance and durability, making them ideal for the rugged UTV environment. Their amplifiers are designed to deliver clear sound at high volumes, ensuring an enjoyable listening experience even in noisy outdoor conditions.
- Rockford Fosgate: This brand is highly regarded for producing reliable amplifiers that provide excellent sound quality and impressive power output. Rockford Fosgate amplifiers are built to withstand harsh conditions, featuring weather-resistant designs that are perfect for off-road adventures.
- Pioneer: Pioneer amplifiers are recognized for their innovative technology and affordability, making them a popular choice among UTV enthusiasts. They offer a range of models that cater to different power needs, ensuring high performance without breaking the bank.
- Kicker: Kicker amplifiers are designed specifically for the demands of outdoor environments, providing robust sound quality and reliability. Their products are engineered for easy installation and integration into UTV audio systems, allowing users to enhance their sound systems effortlessly.
- Kenwood: Kenwood is synonymous with quality audio equipment, and their amplifiers are no exception. They are known for their compact designs and efficient power management, making them suitable for UTVs where space may be limited while still delivering excellent sound performance.
What Benefits Can You Expect from Upgrading Your UTV Audio System with an Amp?
- Improved Sound Quality: An amp can drive speakers more effectively, resulting in clearer sound and better fidelity at higher volumes.
- Increased Volume Levels: With an amplifier, you can achieve higher volume levels without distortion, making it easier to enjoy your music even in noisy environments.
- Better Bass Response: Amplifiers provide the power necessary to drive subwoofers, enhancing the bass performance and giving your audio a fuller sound.
- Extended Speaker Life: By providing the proper power to your speakers, an amp reduces the risk of damage from distortion, potentially prolonging the lifespan of your audio equipment.
- Customization Options: Many amplifiers come with tuning options that allow you to adjust the sound to your preferences, enabling a more personalized audio experience.
Extended speaker life is facilitated by an amplifier’s ability to provide clean power, reducing the stress on your speakers. By minimizing distortion, an amp helps to avoid potential damage that can occur from overdriving the speakers with inadequate power.
Finally, the customization options offered by many amplifiers enable users to tweak their audio settings. This allows for a tailored sound profile that can accommodate various music genres and personal preferences, making every ride more enjoyable.
How Can You Effectively Install an Amp in Your UTV?
Installing an amp in your UTV requires careful consideration of equipment and setup to ensure optimal performance.
- Choosing the Right Amp: The best amp for UTV should be suited for the power requirements of your sound system and the environment in which it will operate.
- Gathering Necessary Tools: You will need specific tools such as a wire stripper, soldering iron, and various connectors for a successful installation.
- Planning the Installation Location: Selecting the right spot for your amp is crucial, as it should be easily accessible while also protected from the elements.
- Wiring the Amp: Proper wiring is essential; ensure you use high-quality cables and secure all connections to prevent shorts and ensure sound clarity.
- Testing the Setup: After installation, it’s important to test the amp and sound system to ensure everything is functioning correctly and to make adjustments as needed.
Choosing the Right Amp: The best amp for UTV should match the wattage and impedance of your speakers for optimal performance. Look for a model that is designed to withstand the rugged conditions often found in off-road environments, such as water resistance and durable construction.
Gathering Necessary Tools: Effective installation requires specific tools including a wire stripper, crimping tool, and a soldering iron to ensure secure connections. Additionally, having zip ties and electrical tape on hand can help with cable management and organization.
Planning the Installation Location: The amp should be placed in a location that minimizes exposure to dust, moisture, and vibrations, which can affect performance. Common locations include under the seat or in a storage compartment, ensuring it is not obstructed and has sufficient airflow.
Wiring the Amp: Use high-quality power, ground, and speaker wires to connect the amp to your UTV’s battery and speakers. Make sure to follow a clear wiring diagram and secure all connections to avoid any issues such as interference or power loss.
Testing the Setup: After installation, turn on your UTV and test the audio system at various volume levels to check for clarity and performance. Pay attention to any distortions or issues, and be prepared to make adjustments to the gain, crossover settings, or speaker placement to achieve the best sound quality.
What Are the Essential Tools Needed for Installing a UTV Amplifier?
To successfully install a UTV amplifier, several essential tools are required for a smooth and effective process.
- Wire Strippers: These are crucial for removing the insulation from the ends of wires without damaging the copper strands. Properly stripped wires ensure a secure and reliable connection to the amplifier and speakers, which is vital for optimal sound quality.
- Screwdrivers: A set of screwdrivers, particularly Phillips and flathead types, is necessary for securing the amplifier in place and connecting terminals. Different sizes may be required depending on the specific screws used in your UTV’s audio system.
- Socket Wrench Set: This tool is important for tightening bolts that hold the amplifier and any mounting brackets securely. A socket wrench can provide better torque than a regular wrench, ensuring that connections are tight and durable.
- Multimeter: A multimeter helps in checking the voltage and continuity of electrical connections. This tool is essential for troubleshooting any issues during installation, such as ensuring that the amplifier is receiving adequate power.
- Heat Shrink Tubing: Used for insulating and protecting splices and connections, heat shrink tubing helps prevent short circuits and corrosion. It ensures that all connections remain secure and protected from the elements once the installation is complete.
- Electrical Tape: This is used for additional insulation of connections and securing wires together. It provides a quick and effective way to ensure that exposed wires are protected from moisture and abrasion.
- Drill and Drill Bits: If new holes are needed for mounting the amplifier, a drill will be necessary. Choosing the right drill bits for the material of the UTV ensures that the installation is clean and professional.
- Wire Connectors: These are essential for joining wires together safely and securely. Options include butt connectors, spade connectors, and ring terminals, which help maintain a strong connection while allowing easy disconnection if needed.
What Steps Should You Follow for a Successful Installation?
To ensure a successful installation of the best amp for UTV, follow these essential steps:
- Choose the Right Location: Select a suitable mounting location for the amplifier that is dry, secure, and allows for proper ventilation. This helps prevent overheating and damage while ensuring easy access for adjustments.
- Gather Necessary Tools and Equipment: Before starting the installation, gather all required tools such as a screwdriver, wire strippers, and a multimeter. Additionally, ensure you have the necessary wiring, connectors, and fuses for a safe and effective installation.
- Disconnect the Battery: Always disconnect the UTV’s battery before beginning any electrical work. This step is crucial to prevent short circuits and electrical shocks while handling the amplifier and wiring.
- Run Power and Ground Wires: Properly run the power wire from the battery to the amplifier, ensuring it is adequately fused. Also, connect a solid ground wire to the amplifier to prevent noise and ensure optimal performance.
- Connect Signal Wires: Link the amplifier to your audio source using RCA cables or speaker wires, depending on your setup. Ensure that connections are secure and correctly matched to avoid any audio quality issues.
- Adjust Settings: Once everything is connected, power on the system and adjust the amplifier settings such as gain, bass boost, and crossover frequency. This fine-tuning will help achieve the best sound quality for your UTV audio system.
- Test the System: After installation, conduct a thorough test of the audio system to check for any issues. Play various types of music to assess performance and ensure that all components are functioning correctly.
- Secure All Components: Finally, ensure all wires, the amplifier, and any other components are securely fastened and free from movement. This step will help prevent damage during operation and ensure longevity of the installation.