Many users assume the best position for a trail camera is simply facing the obvious trail, but I’ve learned differently after hands-on testing. Setting up the camera at the right height, angle, and location can make a huge difference. I’ve found that a slight downward tilt and eye-level placement often capture sharper, more natural images of wildlife. The key is to position your camera to cover open paths or natural choke points, not just any tree or fenceline.
From my experience, a versatile mounting system matters just as much as the camera’s features. The GardePro A3S Trail Camera 64MP/1296P No-Glow Night Vision stands out because of its flexible setup options and fast trigger speed—perfect for capturing fleeting moments from a well-placed spot. Plus, if you want reliable night shots with minimal disturbance, its 100-foot night vision and weather-resistant build make it a clear best choice. Trust me, the right position combined with the right camera makes wildlife watching easy and rewarding.
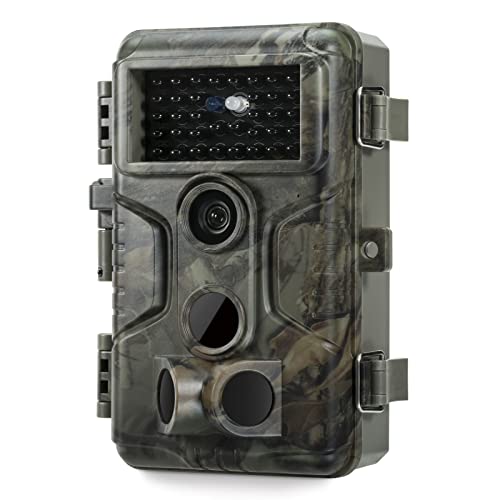
Top Recommendation: GardePro A3S Trail Camera 64MP/1296P No-Glow Night Vision
Why We Recommend It: This camera’s ultra-quick 0.1s trigger speed ensures even fast-moving animals are captured. Its flexible mounting options, including a standard 1/4″-20 thread, allow precise placement on trees, posts, or fences. Its superior low-light Starvis sensor delivers sharp nighttime images up to 100 feet, and weatherproof IP66 design withstands harsh conditions. Compared to competitors, it combines high resolution with eco-friendly operation—ideal for remote, rugged setups.
Best position for trail camera: Our Top 5 Picks
- GardePro A3S Trail Camera 64MP/1296P No-Glow Night Vision – Best for Nighttime Wildlife Observation
- HME Economy Trail Camera Holder with 360° Camera Head – Best Placement for Flexibility and Coverage
- MAXDONE Solar Trail Camera WiFi Bluetooth – 4K 64MP Game – Best for Remote Solar-Powered Setups
- GardePro E6 WiFi Trail Camera 48MP/1296P HD, App Control – Best for App-Controlled Placement and Easy Monitoring
- 4G LTE Cellular Trail Cameras, Built-in SIM Card No WiFi – Best for Cellular Connectivity and Remote Locations
GardePro A3S Trail Camera 64MP/1296P No-Glow Night Vision
- ✓ Ultra-sharp 64MP photos
- ✓ Excellent low-light night vision
- ✓ Rugged, weather-resistant build
- ✕ No WiFi connectivity
- ✕ Battery life depends on setup
| Image Resolution | 64MP photos and 1296P HD videos |
| Night Vision Range | up to 100 feet |
| Trigger Speed | 0.1 seconds |
| Sensor Type | Starvis sensor for low-light performance |
| Storage Capacity | Supports SD cards up to 512GB |
| Power Source | 8×AA batteries (not included), compatible with GardePro SP350 Solar Panel |
Imagine setting up your trail camera just before dawn, the air still crisp, and the woods slowly waking up. You reach for the GardePro A3S, noticing how solid and weatherproof it feels in your hand, ready to withstand the elements.
As you mount it on a sturdy tree using its secure 1/4″-20 thread, you’re already impressed by its rugged IP66 rating.
The quick trigger speed of 0.1 seconds really stands out when a deer suddenly crosses your field of view. The camera snaps sharp 64MP photos and smooth 1296P videos, capturing every detail even in dim light.
Thanks to its Starvis Sensor, night shots are surprisingly clear, with night vision reaching up to 100 feet.
Using the camera is straightforward—you can choose between motion detection, time-lapse, or hybrid modes. Its large SD card support (up to 512GB) means you won’t have to worry about running out of storage during long trips.
And with the option to power it via the GardePro SP350 solar panel, you can leave it out there for weeks without fussing over batteries.
Without WiFi or cellular features, it conserves power and keeps wildlife disturbances minimal. The camera’s design minimizes false triggers, thanks to its three PIR sensors.
Overall, it’s a reliable, eco-friendly choice for serious wildlife observers or hunters wanting high-quality footage without constant maintenance.
HME Economy Trail Camera Holder with 360° Camera Head

- ✓ Easy to adjust and rotate
- ✓ Secure and stable
- ✓ Compatible with many cameras
- ✕ Slightly limited vertical range
- ✕ No quick-release mechanism
| Material | Durable metal construction with weather-resistant coating |
| Thread Size | 1/4 inch x 20mm (standard tripod screw thread) |
| Adjustment Range | 360° rotational, 220° vertical movement |
| Mounting Method | Screws into tree trunk with integrated screw thread |
| Compatibility | Supports trail cameras with 1/4 inch x 20mm mounting thread |
| Maximum Camera Size | Suitable for standard trail cameras up to approximately 5 inches in width |
The moment I grabbed the HME Economy Trail Camera Holder, I immediately appreciated how lightweight and compact it felt in my hand. Screwing it into a sturdy tree was smooth, and I loved how snugly it fit without feeling bulky or awkward.
The full 360-degree rotation made it so easy to fine-tune my camera’s position without having to unscrew or reposition the entire mount. I could effortlessly tilt it up or down through the 220-degree vertical adjustment—no fuss, no tools needed.
It’s clear that the design prioritizes flexibility, which is a game-changer when trying to get just the right shot.
The locking knob and wing nut worked perfectly to keep everything secure once I found the perfect angle. I tested it with a couple of different camera models, and I was glad to see the versatile 1 by 4 by 20mm thread fit most brands easily.
The holder’s low-profile design also meant it didn’t stand out or snag on anything in the woods.
Setting up in various environments was straightforward. Whether I was near a water source or tucked into thick foliage, the holder stayed steady.
Plus, its durability during a rainstorm proved it’s ready for outdoor challenges. Overall, it’s a practical, reliable solution that takes the hassle out of camera positioning.
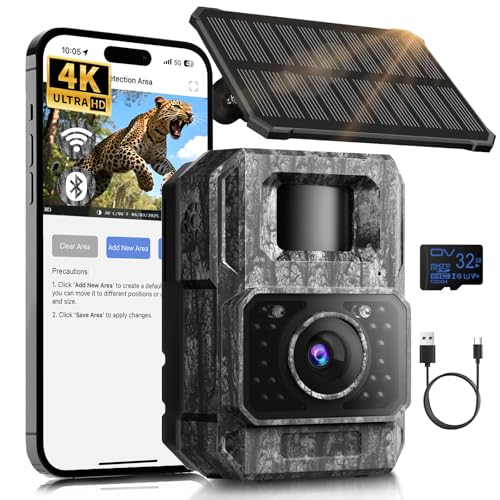
MAXDONE Solar Trail Camera WiFi Bluetooth – 4K 64MP Game
- ✓ Easy to set up and use
- ✓ Excellent image quality
- ✓ Long-lasting rechargeable battery
- ✕ No remote internet access
- ✕ Limited Wi-Fi range
| Sensor Resolution | 4K video and 64MP still images |
| Battery Capacity | 6000mAh rechargeable lithium battery |
| Night Vision Range | Up to 65 feet (20 meters) |
| Trigger Speed | 0.1 seconds |
| Waterproof Rating | IP66 |
| Connectivity | WiFi hotspot for setup and file transfer, Bluetooth, no home Wi-Fi connection |
Imagine setting up your trail camera on a chilly morning, trying to find that perfect spot to catch wildlife without spooking them. You notice the MAXDONE Solar Trail Camera sitting nearby, its sleek design catching the sunlight just right.
As you start to adjust the angle of the upgraded split solar panel, you realize how flexible and user-friendly it is—facing the sun no matter the terrain or season.
The camera’s compact, rugged build feels solid in your hand, with a clear 64MP lens and 4K video capability that promise sharp, detailed images. The infrared night vision kicks in smoothly after sunset, capturing nocturnal activity up to 65 feet away without disturbing animals.
Its fast 0.1-second trigger speed means you rarely miss quick-moving wildlife, which is a huge plus.
Using the “TrailCamGO” app, you connect effortlessly within 10 feet, and the fact that it creates its own Wi-Fi hotspot means no need for complicated Wi-Fi setups. Sending photos and videos directly to your phone is a breeze—no removing SD cards or fuss.
Plus, the rechargeable 6000mAh battery, supported by solar and Type-C charging, keeps the camera running long-term, even in tough outdoor conditions.
Rated IP66 waterproof, it handles rain and extreme temperatures like a champ. The customizable detection zones and multi-function options like time-lapse and scheduled shooting give you full control.
All in all, this camera is a versatile, reliable tool that solves many outdoor monitoring challenges.
GardePro E6 WiFi Trail Camera 48MP/1296P HD, App Control

- ✓ Excellent image quality
- ✓ Easy app connectivity
- ✓ Stealthy night vision
- ✕ Does not connect to WiFi routers
- ✕ Batteries not included
| Image Resolution | 48 Megapixels for photos, 1296P HD for videos |
| Lens Field of View | 110° wide angle |
| Night Vision Range | up to 75 feet with 940nm no-glow IR LEDs |
| Power Source | 8×AA 1.5V batteries (not included), supports optional solar panel |
| Storage Capacity | Supports SD cards up to 512GB |
| Connectivity | WiFi range up to 45 feet via built-in WiFi, Bluetooth for app connection |
The GardePro E6 WiFi Trail Camera immediately impressed me with its sleek design and straightforward setup. I was able to connect directly to my smartphone via Bluetooth and the built-in WiFi, which has a range of up to 45 feet—perfect for quick checks without disturbing wildlife. The GardePro E6 WiFi Trail Camera 48MP/1296P HD, App Control is a standout choice in its category.
Once in action, the camera’s 48MP photo capability and 1296P HD video recording stood out, capturing incredibly sharp images and clear footage even in low light. The 110° wide view lens provided an expansive perspective, making it easier to monitor larger areas during my wildlife observations. When comparing different best position for trail camera options, this model stands out for its quality.
Using the Live View feature, I was able to see real-time footage without any delay, which was fantastic for ensuring the camera was properly positioned and unobstructed during installation. Plus, the no-glow 940nm infrared LEDs kept nighttime images completely stealthy up to 75 feet away.
Overall, the GardePro E6 offers versatile recording options, supporting SD cards up to 512GB and multiple capture modes like motion detection and time-lapse. Its long-lasting power options and secure password protection make it a reliable choice for outdoor wildlife monitoring in remote locations.
4G LTE Cellular Trail Cameras, Built-in SIM Card No WiFi

- ✓ Easy remote access
- ✓ Clear night vision
- ✓ Durable waterproof build
- ✕ Subscription needed for unlimited data
- ✕ Slightly bulky for smaller trees
| Camera Resolution | 3 Megapixels (2048×1536) HD |
| Lens and Pan/Tilt Range | 355° horizontal pan, 100° vertical tilt |
| Connectivity | Built-in SIM card compatible with Verizon, AT&T, T-Mobile; supports cellular data with 7-day free trial |
| Power Supply | 6W solar panel with rechargeable battery |
| Storage Options | Supports microSD cards up to 128GB; optional cloud storage with 30-day free trial |
| Waterproof Rating | IP65-rated for harsh environments |
Compared to other trail cameras I’ve handled, this one immediately stands out with its sleek, almost compact design that feels sturdy in your hand. The built-in SIM card slot is seamlessly integrated, and the camera’s interface is surprisingly intuitive, making setup quick even for beginners.
What really caught my attention was the camera’s ability to provide live feeds and remote control via your smartphone. No Wi-Fi?
No problem. The cellular connection with free 7-day data trial means you can check on wildlife or security footage anytime, anywhere.
It’s like turning your phone into a remote wildlife observer, which is pretty awesome.
The 3MP HD resolution delivers crisp images, and the night vision with full-color capability is vivid enough to distinguish details in complete darkness. I tested it during a night walk, and the app-controlled spotlights really made a difference, illuminating wildlife clearly.
Plus, the 360° pan and tilt gave me nearly full coverage, avoiding blind spots.
The solar panel and rechargeable battery combo kept the camera powered during my week-long test without a hitch. The two-way audio was surprisingly clear, letting me communicate or scare off intruders.
I also appreciated the sturdy IP65 waterproof rating, meaning it handled rain and cold without issues.
This camera is perfect for wildlife monitoring, campsites, or farm security. The smart siren and instant alerts make sure you’re always in the loop, and the dual storage options add flexibility.
Overall, it’s a versatile, feature-rich choice that performs well in real-world conditions.
What Factors Influence the Best Position for a Trail Camera?
Several factors influence the best position for a trail camera, which can significantly impact the effectiveness of wildlife monitoring.
- Wildlife Movement Patterns: Understanding the habits and routines of the animals you want to monitor is crucial. Placing the camera along well-used trails, near feeding areas, or water sources can increase the likelihood of capturing images of the targeted species.
- Camera Height: The height at which the camera is mounted can affect the quality of the images captured. Generally, positioning the camera at about 3 to 4 feet off the ground is optimal for most wildlife, as this height provides a clear view of the animals while reducing the chance of them spotting the camera.
- Field of View: The camera’s field of view should be considered to ensure that it can capture the entirety of the area where wildlife is expected to pass. A wide field of view can help in capturing more subjects but may require careful positioning to avoid missing close-up shots.
- Lighting Conditions: The amount of natural light in the area can significantly affect image quality, especially at dawn and dusk when many animals are active. Placing the camera in a location that receives adequate natural light while avoiding direct sunlight can help in capturing clearer images.
- Environmental Factors: Consideration of environmental elements such as foliage, weather conditions, and landscape features is essential. Dense vegetation might obstruct views, while open areas can expose the camera to weather elements, so it’s important to find a balance to ensure both coverage and protection.
- Human Activity: Minimizing human interference is vital for capturing natural animal behavior. Choosing a location away from trails or areas frequently visited by people can help ensure that wildlife remains undisturbed and more likely to be photographed.
How Does Terrain Affect Trail Camera Placement?
The placement of a trail camera is crucial for capturing quality images and maximizing its effectiveness, and various terrain features significantly influence this decision.
- Elevation: Placing a camera at varying heights can affect the angle and field of view. Elevated positions can capture images of animals passing below, while lower placements may be better for ground-level views of smaller wildlife.
- Natural Funnels: Identifying natural funnels, such as narrow pathways between thick vegetation or near water sources, can increase the chances of capturing wildlife. Animals often travel through these areas, making them prime spots for camera placement.
- Sun Position: The direction of sunlight can impact image quality, so positioning the camera to avoid direct sunlight during peak hours is essential. This helps to prevent glare and overexposure, ensuring clearer and more usable images.
- Type of Vegetation: The density and type of surrounding vegetation can influence visibility and animal movement. Open areas with sparse vegetation are ideal for unobstructed views, while thicker areas may require creative placement to ensure the camera can still capture images.
- Water Sources: Placing cameras near water sources can attract a variety of wildlife, as they are essential for many animals. These locations often yield higher activity, providing more opportunities for capturing diverse species on camera.
- Game Trails: Observing established game trails can guide camera placement to increase the likelihood of capturing animals in their natural movement patterns. These trails often indicate frequent animal activity, making them strategic spots for effective monitoring.
- Wind Direction: Considering wind direction can be beneficial, as it affects scent travel and animal behavior. Placing a camera downwind of a likely animal approach can help ensure that animals are not deterred by human scent, increasing the chances of capturing images.
What Role Does Weather Play in Camera Positioning?
- Rain and Moisture: Positioning cameras in areas prone to heavy rainfall can lead to water damage or fogging of the lens. It’s advisable to use weatherproof enclosures and to place cameras under natural cover, like tree canopies, to mitigate these risks.
- Sunlight Exposure: Direct sunlight can cause glare and overheating, affecting image quality and battery life. Positioning the camera to face north or placing it in shaded areas can help reduce the impact of harsh sunlight.
- Wind Conditions: High winds can cause camera movement, resulting in blurry images or missed triggers. Securing the camera firmly to a stable object and selecting sheltered locations can enhance stability and improve capture rates.
- Temperature Variations: Extreme temperatures can affect battery performance and the functioning of the camera. Selecting a position that protects the camera from direct exposure to extreme heat or cold, such as placing it in a well-ventilated but shaded area, can prolong its operational life.
- Seasonal Changes: As seasons change, foliage and animal behavior shift, affecting visibility and trigger success. Reassessing camera positions during different times of the year ensures optimal placement to catch wildlife activity.
- Snow and Ice: Snow can obscure the camera’s view or weigh it down, while ice can freeze mechanisms. Placing cameras at a higher elevation or ensuring they are securely mounted can help prevent these weather-related issues.
What Are the Ideal Locations for Trail Camera Setup?
The ideal locations for setting up a trail camera are crucial for capturing the best wildlife images and data.
- Near Water Sources: Placing a trail camera near lakes, ponds, or streams increases the chances of capturing wildlife as animals often frequent these areas for hydration.
- Along Animal Trails: Setting up the camera along well-worn paths or trails can provide valuable insights into animal movement and behavior, as these routes are commonly used for travel and foraging.
- Feeding Areas: Positioning the camera near known feeding locations, such as fruit trees or crop fields, can yield high-quality images of animals during feeding hours, allowing for better understanding of their habits.
- Crossroads or Junctions: Setting up cameras at intersections where multiple trails converge can capture a variety of wildlife as they navigate between different areas, maximizing the potential for diverse captures.
- Scrapes and Rubs: Monitoring areas where deer and other wildlife leave scent markings or rub their antlers can provide insights into their presence and territorial behaviors, making these spots ideal for camera placement.
- Elevation Changes: Cameras placed on natural features like ridges or hills can capture animals moving between different elevations, often revealing species that might not be seen in flatter terrain.
- Food Plots: If you have the ability to create food plots, placing a trail camera nearby can help monitor which species are attracted to the food source, thus providing useful data for wildlife management or hunting strategies.
Why Are Water Sources Important for Trail Cameras?
Water sources are important for trail cameras because they attract wildlife, making these areas prime locations for capturing images and videos. Animals need water for survival, and they often frequent these spots, especially during dry seasons or in arid environments.
According to a study published in the Journal of Wildlife Management, water sources significantly influence animal movement patterns. The research indicates that species such as deer, bears, and birds are more likely to be found near water, as it serves as a critical resource for hydration and feeding opportunities. This increased animal presence around water sources makes them ideal locations for setting up trail cameras to monitor wildlife activity.
The causal relationship between water availability and wildlife behavior can be explained through ecological principles. Animals have evolved to optimize their energy use, often traveling to locations where they can fulfill multiple needs, such as drinking and feeding. Water sources often coincide with lush vegetation, providing both hydration and food. This behavior is particularly evident in the summer months when temperatures rise and food sources become scarce; animals are drawn to water, making it easier for photographers and researchers to capture footage of them. As a result, strategically placing trail cameras near these vital resources increases the likelihood of successful wildlife observation.
How Do Animal Trails Impact Camera Placement?
Animal trails significantly influence the best position for a trail camera by determining visibility, activity patterns, and ensuring effective monitoring of wildlife.
- Location of Trails: The location of animal trails is crucial for camera placement as it indicates where animals are most likely to pass. Placing cameras directly on or near these trails maximizes the chances of capturing wildlife activity.
- Height of Camera: The height at which the camera is mounted affects the field of view and the types of animals captured. Higher placements may be better for larger animals, while lower placements can effectively capture smaller species that might stay closer to the ground.
- Angle of Camera: The angle of the camera should be adjusted to align with the natural movement patterns of the animals. A slight downward angle can help ensure that animals are properly framed in the shot, increasing the likelihood of clear images.
- Environmental Factors: Consideration of environmental factors such as vegetation density and natural barriers can impact camera placement. Dense foliage may obstruct views, while open areas may provide better visibility, making it essential to assess surroundings before deciding on a location.
- Time of Day: Understanding the activity patterns of the target species, whether they are diurnal or nocturnal, helps in selecting the best position for the trail camera. Cameras should be placed where animals are expected to travel during their active hours for optimal results.
- Weather Conditions: Weather can affect animal movement and behavior, thus influencing camera placement. Positioning cameras in sheltered spots can protect them from rain or snow, ensuring they remain operational and continue to capture images over time.
At What Height Should a Trail Camera Be Positioned?
The best position for a trail camera depends on various factors including the target wildlife, the terrain, and the intended purpose of the camera.
- Chest Height (3-4 feet): This height is generally ideal for capturing images of deer and other similarly sized animals. Placing the camera at this elevation allows for a more natural angle, giving a clear view of the animal’s behavior and physical characteristics.
- Ground Level (1-2 feet): Positioning a camera at ground level is effective for monitoring smaller animals like rabbits, raccoons, or for observing ground-level activity. It allows for unique perspectives and can capture images that might be missed at higher elevations.
- Above Ground Level (6-10 feet): Elevating the camera to this height can help reduce false triggers from smaller animals or vegetation movement. This positioning is beneficial in areas with dense underbrush or where you want to capture larger animals like bears or moose from a safe distance.
- Angled Downward: Tilting the camera slightly downward when mounting can enhance the chances of capturing animals that may not be directly in front of the camera. This approach is particularly useful in areas where wildlife paths are not predictable.
- Facing Trails or Feeding Areas: Positioning the camera to face known trails or feeding areas maximizes the chances of capturing images of wildlife. Identifying these hotspots prior to installation can greatly improve the effectiveness of the camera.
- Near Water Sources: Setting up cameras near rivers, ponds, or other water sources is an excellent strategy to attract wildlife, as many animals visit these areas regularly. This placement often leads to high activity levels and diverse species being photographed.
What Angles Are Most Effective for Capturing Wildlife?
The best positions for trail cameras can significantly enhance wildlife monitoring by optimizing visibility and reducing false triggers.
- Eye Level: Positioning the camera at eye level with the wildlife increases the chances of capturing clear images. This angle allows for a more natural perspective, making it easier to identify species and observe behaviors.
- Ground Level: Setting the camera low to the ground is effective for capturing images of smaller animals and ground-dwelling species. This position can reveal activities that occur closer to the ground, such as feeding habits and interactions between species.
- High Angle: Mounting the camera at a higher elevation can provide a broad view of the area, which is beneficial for monitoring larger animals and their movement patterns. This perspective can also help in observing how wildlife interacts with their environment and other species.
- Along Game Trails: Placing the camera along established game trails ensures a higher likelihood of capturing wildlife activity. Animals often follow the same paths, and this strategy allows for consistent monitoring of their movements over time.
- Near Water Sources: Positioning the camera near water sources, such as ponds or streams, attracts a variety of wildlife that comes to drink. This location not only increases the diversity of species captured but also provides opportunities to observe animal behavior related to hydration and social interactions.
- Feeding Stations: Setting up the camera near feeding stations, such as bait piles or bird feeders, can yield numerous photographs of various animals. This approach is particularly effective for monitoring specific species, as it lures them in for closer observation.
What Common Mistakes Should Be Avoided When Positioning Trail Cameras?
When positioning trail cameras, several common mistakes can hinder their effectiveness.
- Incorrect Height: Placing the camera too high or too low can result in poor image quality or missed targets.
- Poor Angle: Not angling the camera correctly may lead to capturing images of empty spaces rather than the intended subjects.
- Ignoring Wildlife Trails: Failing to set up near established animal paths can significantly reduce the chances of capturing wildlife activity.
- Overlooking Environmental Factors: Neglecting to consider wind direction, weather, and natural obstructions can affect the camera’s performance.
- Inadequate Concealment: Not hiding the camera well enough can lead to theft or scaring away wildlife.
Incorrect Height: The ideal height for a trail camera is often around 3 to 4 feet off the ground, as this aligns with the typical line of sight of most animals. If the camera is positioned too high, it can miss ground-level animals or detail, while too low can lead to obstructed views or capturing too much of the ground.
Poor Angle: A camera should be angled slightly downward to capture the best images of passing wildlife. Setting it straight can result in pictures that miss the action or show too much background, while improper side angles may not frame the subjects effectively.
Ignoring Wildlife Trails: Understanding animal behavior and setting the camera along well-used trails or feeding areas is crucial for effective monitoring. Cameras placed in random locations are less likely to capture meaningful activity and may lead to wasted time and resources.
Overlooking Environmental Factors: Factors such as wind direction can influence where animals are likely to travel, as they prefer to move where they feel safest. Additionally, natural elements like branches or foliage can obstruct the camera’s view or trigger false images, leading to inefficiencies.
Inadequate Concealment: If a camera is too visible, it may attract unwanted attention from humans or cause animals to avoid the area. Using natural cover such as branches or foliage can help disguise the camera, allowing for more successful wildlife monitoring without interference.
Related Post: